Blackout
In case of an emergency, for example, a blackout, a number of establishments such as shops, pharmacies and banks may be closed. Make sure that you have a supply of food, water, medicine, cash and required things.
In the event of hostilities, the supply of electricity, water, gas, heat, telephone, mobile network, Internet, ATMs and bank terminals, shops and pharmacies may be completely or partially blocked.
How to dress outside in winter so as not to freeze?
In case of an emergency situation in winter – evacuation, long-term absence of heating due to a blackout, forced long stay outside, etc – it’s important to take care of warm clothes.
Tourist clothing from proven manufacturers will protect you from the cold the best. It’s of high quality and designed for different temperature conditions. It’s better not to choose military clothes (camouflaged or green) for the civilian people in wartime. Instead, the military suggests using a special system of clothing for cold weather (Extended Cold Weather Clothing System). It was developed for the American military.
A seven-layer system of clothing for cold weather includes:
The first layer. Underwear that wicks away moisture (shouldn’t make you warm)
The second layer. Warming underwear
The third layer. Fleece jacket (fleece items can’t be worn on the naked body)
The fourth layer. Light windproof jacket (protects against wind and moisture)
The fifth layer. Softshell jacket (protects against wind and moisture)
The sixth layer. Warming jacket with membrane fabric (this is a breathable surface that doesn’t allow wind and moisture to pass through)
The seventh layer. Warmer (for extremely cold weather)
These layers should be combined depending on the weather, conditions and activity.
- If in the cold season you’re outside for a long time (for example, standing in line at the border or at a block post) and don’t have the opportunity to move actively, wear all 7 layers.
- If you have the opportunity to move, refuse the upper layers, because it’ll be hard and hot for you.
- If the temperature outside is from +5 to +10, the first 4 layers will effectively protect against cold. And at night you can add the 5th layer.
How to choose thermal underwear?
- Give preference to travel brands.
- Wear two layers of thermal underwear:
- The first layer, designed to withdraw moisture, should be made of synthetic material.
- The second layer – a thin fleece or synthetic material with the addition of wool – should make you warm.
- Don’t confuse the first and second layers of thermal underwear. If you wear only fleece, moisture will not escape and you will sweat quickly.
Shoes are also the best to choose among tourist and trekking ones.
Check that it is:
-
not tight
-
leather
-
with a layer of Gore-tech (“breathable” fabric that doesn’t allow moisture to pass through) on top
-
with warmer such as Thinsulate and PrimaLoft (not fur, because then your foot will be wet)
-
with a VIBRAM sole
You should also remember about a scarf, hat and gloves. The latter should be chosen from water-repellent fabric.
How to warm up when you got cold
If you’re outside and realize that you’re cold:
- move more: this will help improve blood circulation and keep you warm
- if possible, drink hot tea
- don’t rub snow on pale skin
- frozen hands can be quickly warmed under the armpits
- hide from the wind
- try to find a place where you can keep warm
- if you’re in the forest, light a fire, remove and dry your clothes (exercise at this time)
Consider that thermoregulation is not established in children, and it may be impaired in the elderly. These categories of people are most susceptible to hypothermia.
If you got cold and entered the building:
- don’t immediately step to a hot battery or dive into a hot bath, as recovery should be gradual
- don’t drink alcohol: it increases metabolism and promotes heat transfer
- remove wet clothing
- wear warm woolen clothes
- cover yourself with a blanket
- drink warm milk or tea
If the room is cold, you can use a heating pad to warm up. Which one to choose?
If you’re stationary most of the time and have electricity, choose an electrical heating pad.
a cheaper option is an ordinary heating pad for filling with hot water (for several hours)
if it’s not possible to buy heating pad, you can use an ordinary plastic bottle with hot water (but not boiling water) instead
If you have to move, you can buy a chemical heater (disposable, designed to warm hands or feet in critical cases for 5-6 hours). It can’t be applied to a naked body – there must be a layer of clothing.
the most expensive option is a catalytic heating pad (for 5-6 hours, convenient, small size). It is filled with gasoline for lighters.
What to do with frostbite
Most frostbite occurs on the fingers and toes, nose, ears and cheeks. Signs of frostbite:
- lethargy, fatigue and drowsiness
- chills, shivering
- decrease in body temperature
- finger pain
- loss of consciousness
- weak breathing
- the frostbite part of the body becomes pale, cold and insensitive
How to help:
Determine the degree of frostbite.
I degree – pale skin, edema, reduced sensitivity
II degree – blisters filled with transparent or white liquid
III degree – skin necrosis, blisters filled with dark red liquid
IV degree – blisters filled with black liquid
With the I degree of frostbite, you need to warm the relevant parts of the body with warm hands, light massage or breathing. Next, you should apply a clean cloth bandage.
With II – IV degrees of frostbite, massage can’t be done. It’s necessary to apply bandage immediately. The relevant parts of the body should be immobilized and covered with something warm (blanket, woolen fabric, etc.)
If possible, take the person to a warm place. Remove wet clothes, shoes, socks and gloves from him. This should be done carefully, without effort, so as not to harm more.
If possible, call an ambulance.
If the person is conscious, give him warm tea.
Constantly look after the person until the arrival of doctors and (or) his transportation to the hospital.
What can’t be done with frostbite
- intensively rub the frostbitten part of the body
- warm frostbitten areas near a fire, or use heating pads or other sources of heat
- use oils and fats on the affected areas, rub the limbs with alcohol
Not Visible on the Road: How to Choose and Properly Wear Reflective Elements
In the dark, a pedestrian can be almost invisible to drivers. Even at a pedestrian crossing, this does not guarantee safety: in rain, on wet asphalt, or in poor lighting, a person’s silhouette blends into the surroundings. At best, a driver may notice a pedestrian from 30–40 meters away — which is critically insufficient to brake in time.
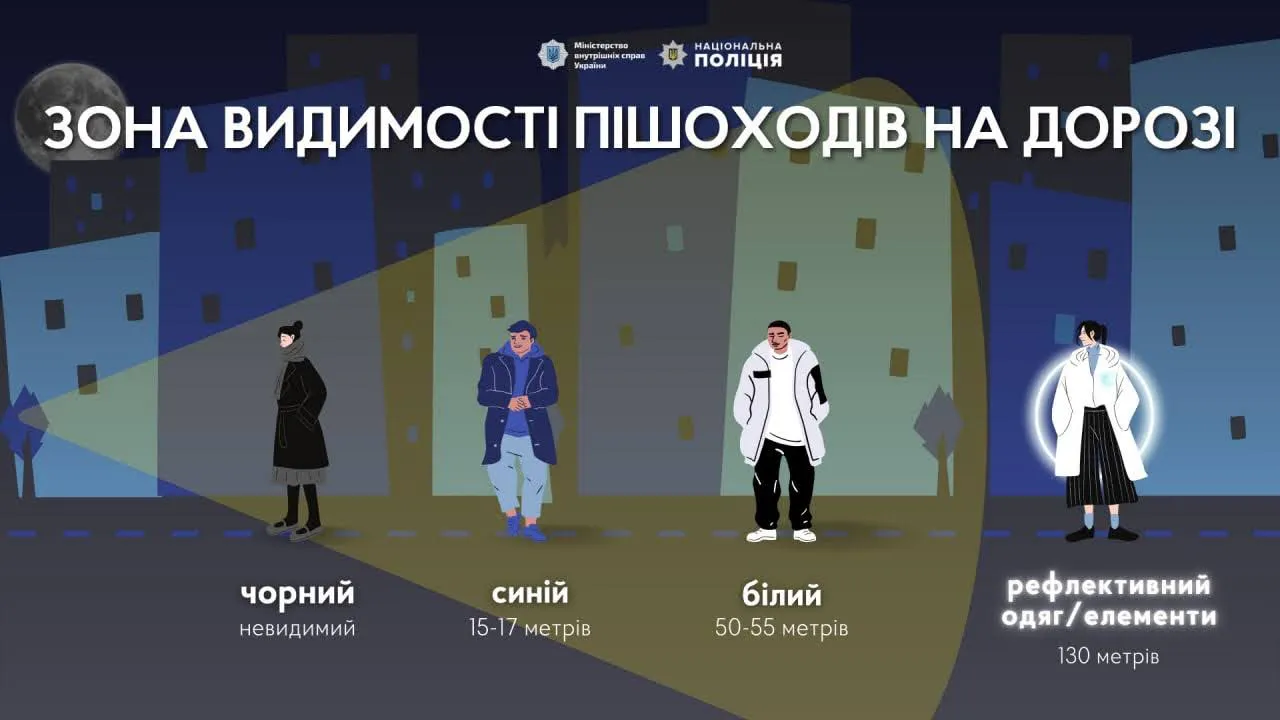
Reflective elements — also known as reflectors or “flickers” — help pedestrians stay visible on the road. With reflectors, visibility increases to 130–200 meters (with low-beam headlights), giving drivers enough time to avoid hitting a pedestrian.
A Requirement, Not Advice: What Traffic Rules Say
Pedestrians are full participants in road traffic and have both rights and responsibilities. Wearing reflective elements in the dark is not just a recommendation or an accessory — it is a direct requirement under Ukraine’s Traffic Rules.
According to clause 4.4 of the Traffic Rules (as amended in November 2020):
Pedestrians moving along the roadway or shoulder in the dark or in conditions of limited visibility must use reflective elements (tape, stickers, vests, etc.) or wear clothing with reflective elements to ensure they are visible to other road users in time.
How to Choose an Effective Reflector
A reflector does not emit light on its own — it reflects headlights back toward the driver, making the pedestrian visible in the dark. Its effectiveness depends on material quality and how it is selected.
Selection criteria:
- Reflectivity coefficient. The higher the value (measured in candelas per square meter), the earlier a driver will see you. For everyday use, 300–500 cd/m² is sufficient. Look for safety standards such as EN 13356 or EN ISO 20471.
- Color. Choose high-contrast, highly visible colors: yellow, lime, white, or silver. Decorative colors (pink, blue) are less effective.
- Attachment and durability. The fastening should be secure so the element does not fall off or turn inward. A good reflector should be moisture-resistant, hold up in rain, and not peel off.
Types of Reflective Elements and Their Use
- Vests and bands — provide maximum visibility; best for roadsides, highways, and areas without sidewalks.
- Patches and strips — durable and washable; ideal for outerwear.
- Self-adhesive stickers — easy to apply on backpacks, bags, clothing, shoes, or vehicles (bicycles, scooters); suitable for city use.
- Keychains and pendants — convenient for attaching to bags or backpacks.
- Reflective paint — used on bicycles, helmets, scooters, strollers, and clothing.
Before choosing reflectors, consider how many you need and where they should be placed to ensure you have them with you at all times — regardless of what you are wearing.
If you rely only on separate accessories, they are easy to forget at home. To avoid this, choose options that stay with you constantly — for example, a keychain on your bag.
Reflective elements integrated into clothing or regularly used accessories help ensure visibility in any situation.
| Type | Advantages | Disadvantages | Best use cases |
| Self-adhesive stickers | Easy to apply, inexpensive | May peel off | City use, everyday walks |
| Patches and strips | Durable, resistant to washing | Require time to attach | Outerwear (especially in winter) |
| Keychains and pendants | Easy to carry | May get lost | Clearly visible from behind |
| Vests and bands | Maximum visibility, comfortable | More expensive, not always stylish | Roadsides, highways, areas without sidewalks |
Key Rules for Wearing Reflectors
Even having a reflector does not guarantee safety if it is worn incorrectly.
- Size matters. The reflective surface area is critical. Recommended minimum: approximately 15 cm² on each side of the body.
- Placement — higher and on moving parts. Place reflectors higher (shoulders, backpack, chest, arms), rather than too low (like shoes), where they may be obscured. Reflectors on moving body parts (arms and legs) make pedestrians more noticeable.
- Coverage from all sides. Attach reflectors on all sides (front, back, and sides) and at different heights to remain visible from any direction.
Common Mistakes
- Reflector only on one side — insufficient for multi-directional traffic.
- Too small — a single small keychain does not provide enough reflective surface area.
- “I wear light clothing, so I’m visible” — light clothing helps but does not replace reflectors.
- Dirty or worn reflector — dirt and damage reduce effectiveness; replace when needed.
- Wearing reflectors only for long trips — most incidents happen close to home.
How to Care for Reflectors
To maintain effectiveness:
- do not wash with bleach;
- do not iron reflective surfaces;
- air-dry only.
Special Categories of Pedestrians
- Children. Less visible due to their height — use multiple reflectors (head, backpack, jacket, legs). Choose options that are difficult to remove.
- Infants (strollers/sleds). Add reflectors to the stroller — it enters the road before the adult pushing it.
- Runners and cyclists. Add reflectors to helmets, backpacks, and frames; use wrist/ankle bands and reflective vests.
- Pets. Attach reflectors to collars or use light-up accessories; in winter, choose reflective clothing.
Additional Safety Tips
Even with reflectors:
- wear light or bright clothing;
- cross only at designated crossings;
- make sure the driver sees you before stepping onto the road;
- use a flashlight in the dark;
- lower your headphone volume and avoid phone distractions;
- teach children safe road behavior and accompany them after dark.
How to warm up the dwelling
Make sure that your home is efficiently heated in winter and that there is no heat loss in the house or flat. Effective home insulation will also help reduce the numbers in heating bills.
How to warm up your home for winter – see the video for clear steps:
How to keep an apartment warm without heating
When it is cold indoors, the main task is to reduce heat loss and warm up “locally” — meaning your body and one room — rather than trying to heat the entire apartment.
Step 1. Choose a “warm room.”
- Choose the smallest room where the door can be closed tightly.
- Move there and bring water, a first aid kit, power banks, and flashlights.
- Seal gaps around the door with towels or blankets to reduce cold air coming through.
Step 2. Reduce heat loss through windows and drafts.
Even without major insulation, one simple rule helps: eliminate drafts and create an “air layer.” In practice, this has the greatest effect with minimal materials. (See the detailed window tips below.)
Step 3. Warm up “locally.”
- Clothing: wear several layers, dry socks, and a hat. This is perfectly normal indoors too.
- Blanket/quilt: several thinner layers are better than one very thick one.
- Heating pad: use a standard hot-water bottle or a plastic bottle filled with hot water (not boiling) wrapped in a fabric cover.
- If you have electricity, use an electric heating pad or electric blanket — they warm the body directly and use less electricity than a room heater. Make sure to plug them in without overloading the circuit.
Step 4. Ventilate safely.
If you use any combustion-based heat source (a stove, potbelly stove, or burner), ventilation is mandatory. Carbon monoxide is odorless and can build up undetected.
How to insulate windows with improvised materials
The biggest heat loss in winter comes from gaps and drafts. So the first step is to eliminate drafts, and the second is to create an extra barrier.
- Find where the draft is coming from.
- Run your hand along the joints between the frame and the sash.
- If you have a candle or match and it is safe to use one, the flame will reveal a draft by flickering. Do not do this near curtains or other flammable materials.
- Seal the gaps.
- Seal joints with whatever you have on hand: masking tape, paper, or fabric.
- Gaps under the windowsill or near the frame can be temporarily blocked with cloth or a rolled-up towel.
- Add transparent film as an “air layer.”
- If you have transparent film, stretch it across the window frame so that a layer of air forms between the glass and the room.
- Important: the film must be fixed evenly, with no large gaps, otherwise the draft will remain.
- Use curtains or blankets as an extra layer.
- Thick curtains reduce heat transfer through cold glass.
- At night, you can add a blanket over the curtains as a temporary layer, but make sure the fabric does not touch heat sources or block ventilation.
Foil and blankets on windows: when this makes sense and when it does not
A blanket on a window can temporarily reduce heat loss by adding another layer and reducing heat transfer to the cold glass. This works best:
- at night, when there is no sun;
- in the room you have chosen as your “warm room,” where you keep the door closed.
Foil on a window as a “thermal screen” has drawbacks. It reflects radiation well, but on a window it can:
- block solar heat during the day;
- reduce light and create discomfort, which also matters during a blackout.
So the practical rule is:
- if there is sunlight, it is better not to block the incoming light and heat;
- if it is freezing and there is no sun, or it is nighttime, thick curtains or a blanket used as a temporary layer are appropriate.
What to do if the electricity goes out
If you are outside and a power line has fallen nearby:
- Do not touch the wires or try to repair them!
- If a wire has broken and fallen nearby – leave the danger zone using small shuffling steps or by hopping (keeping your feet together) to avoid electric shock.
- If you see a fallen power line, do not approach within 8 meters and report it to the dispatcher of the maintenance service or regional energy provider (dispatcher phone numbers are posted on distribution boards, power cabinets, and transformer substations).
- Find the nearest shelter or go home.
Where to find Points of Invincibility
Points of Invincibility are locations that typically have heat, a generator, communication and internet access, water, a first aid kit, and where you can rest briefly.
The fastest way to find the nearest Point of Invincibility is the Diia app
- Open Diia.
- Go to the app.
- Select Services → Invincibility.
- Open the map and allow access to your geolocation — Diia will show Points of Invincibility within a 1.5 km radius (if you prefer not to share your location, you can find points by zooming).
- Tap the Build route button.
To find a Point of Invincibility in Diia without internet access, download the map:
- Open the app.
- At the bottom, select Services → Invincibility.
- Tap Next at the bottom of the welcome screen.
- Allow Diia access to your geolocation — the app will detect the nearest region.
- Tap the yellow moving banner at the top.
- Download the map — a message should appear confirming that the city or region map is available offline.
Use the filter to find a point with the required amenities (ramp, internet access, mobile connection, generator).
For security reasons, the geolocations of Points of Invincibility are not displayed in Kherson, Donetsk, Zaporizhzhia, Luhansk, and parts of Kharkiv, Chernihiv, Dnipropetrovsk, and Mykolaiv regions.
Their addresses can be obtained from local self-government bodies or regional military administrations. Look for contact details directly on the websites of these institutions or on the Government Contact Center website, under “Reference Information” → “Hotlines of local executive authorities.“
Official chatbots “POINTS OF INVINCIBILITY” in messengers
Telegram — @nezlamnistbot
Viber — viber.com/nezlamnistbot
- open the chatbot link in your messenger;
- press the “Start” button;
- select “Find a location” in the menu;
- share geolocation or enter the name of the city or district and street;
- get a list of available locations with addresses, opening hours, and amenities.
Information in the chatbots is updated directly from official sources.
The enemy creates fake official chatbots on Telegram. Before sharing any data, verify the chatbot using the “BotChecker” tool — it will show whether the bot is genuine or fake..
Via hotline or 112 app
This is the single emergency number through which you can also find the addresses of the nearest Points of Invincibility or shelters. Calls are available from all regions of Ukraine.
The 112 line works even without a mobile connection if you:
- connect to Wi-Fi (in cafes, shopping centers, shops, or medical facilities);
- download the 112 Ukraine app and log in.
Local authorities
Many regional and city administrations publish lists of Points of Invincibility on their official websites or via social media — a reliable way to get local information.
For the capital
For Kyiv specifically, the map of heating points and Points of Invincibility can also be found:
- on the website gis.kyivcity.gov.ua/nezlamnist/;
- on Google Maps http://e.surl.li/xwuhxe (Heating points of Kyiv);
- in the Kyiv Digital app (section “More services” (K) – “Safety” – “Resilience map”);
- on the Kyiv City State Administration website (“Safety and law enforcement” — “In case of power outage” — “Heating points deployed in the capital”).
If you are at home and the electricity goes out:
- Unplug electrical appliances to avoid damage from voltage fluctuations.
Which appliances put the most load on the grid
When electricity is restored, it is important not to overload the grid or create fire risks. The highest consumption typically comes from appliances that heat or cool, as well as powerful electric motors. The most significant consumers include:
- electric oven / cooking appliances;
- air conditioner;
- washing (and drying) machines;
- other high-power appliances (vacuum cleaner, etc.).
Practical rules during blackouts/outages
- Do not turn on several high-power appliances at the same time.
- If heating is electric, use localized solutions (electric heating pad or electric blanket) rather than heating the entire room.
Do not use gas stoves for heating — there is a risk of carbon monoxide poisoning.
Is it safe to heat a home with a gas stove?
A gas stove and oven are intended for cooking only, not for heating. Using them otherwise increases the risk of:
- carbon monoxide accumulating indoors due to incomplete combustion and/or poor ventilation;
- gradual deterioration of health without warning signs — carbon monoxide is colorless and odorless, and a person may lose consciousness without realizing it.
How to act safely if you need to cook with gas during a blackout
- Use the stove only for cooking (short cycles).
- Ensure adequate airflow (ventilation).
- Do not leave it unattended.
If you experience a headache, nausea, or weakness, this may be a sign of carbon monoxide poisoning — stop using the stove, open windows, go outside, and call emergency services if necessary.
- If your building has an elevator, check that no one is trapped inside.
- Follow official announcements from authorities or the State Emergency Service. If the mobile network is down, find a battery-powered radio.
- If you use a generator, place it outside and away from windows.
Prepare in advance for a blackout:
- a battery-powered radio and flashlights;
- a supply of matches, candles, and solid fuel tablets;
- a charged power bank;
- at least a one-week supply of drinking water and canned or freeze-dried food;
- a first aid kit, including personal medications for at least one week.
During power outages, household appliances are most at risk not from the blackout itself, but from voltage fluctuations when electricity returns. Unstable current supply, sudden voltage spikes, and the simultaneous switching on of many devices can cause damage. The highest risk applies to refrigerators, washing machines, boilers, air conditioners, and pumping equipment, as well as TVs, computers, and routers.
- Unplug devices after outages to reduce the risk of damage from voltage spikes.
- Do not turn on appliances immediately after power returns — give the grid time to stabilize. Even a few minutes of waiting can prevent damage.
After electricity is restored:
- Wait 5–10 minutes.
- Turn on lighting to check voltage stability.
- Wait 20 minutes, then connect the router, small electronics, and critical appliances such as the refrigerator.
- After 40–60 minutes, connect high-power appliances: the boiler, washing machine, and so on.
- Install a surge protector (from 500 UAH).
This is an extension cord with multiple sockets that has built-in protection against short voltage spikes. You can connect several small devices to it — suitable for a router, TV, computer, and chargers. Basic extension cords without protection do not offer this benefit.
- Buy a voltage stabilizer or UPS.
These are devices that regulate voltage if it is constantly too high or too low. Unlike a surge protector, they handle not only short spikes but also long-term voltage issues. Stabilizers are most often installed for individual appliances: refrigerator, gas boiler, server.
- Install a voltage relay with a delayed restart.
This device automatically cuts power at dangerous voltage levels and prevents appliances from switching on immediately after electricity is restored, giving the grid time to stabilize. A voltage relay must be installed by an electrician — consult one before purchasing to choose the right parameters for your home.
Generators and inverters can also damage appliances
Some generators and inverters supply electricity of lower quality than the standard grid. Voltage may be unstable or fluctuate sharply, causing appliances to operate under increased load, overheat, or gradually fail — even if everything appears normal externally.
- Connect appliances through additional protection — voltage stabilizers or a high-quality UPS — to help avoid voltage spikes.
- Do not start high-power appliances immediately after connecting a generator. Let the system run for a few minutes in stable mode, then turn on devices gradually.
How to make the Internet at home not dependent on the availability of electricity
In case of planned or emergency power outages, Ukrainians are looking for ways to make their houses autonomous, independent of whether there is electricity or not. This also applies to the Internet. Here are some ways to stay “online” even after the power has been turned off at home.
Option 1. Uninterrupted internet from provider
Find out from your Internet service provider if they have an option to access the network during a power outage. There are two options:
- PON-technology. In the situation of a power outage, the Internet continues to be provided by telecom operators using PON technology (Passive Optical Network). Uninterrupted service is provided by fiber optic cable. In most cases, local providers use fiber optics to bring the Internet from their equipment to the point of Internet distribution among users, i.e., a network switch in the building. They are usually installed in the basement or on the roof of an apartment building. And from there, connections are laid to each apartment. However, for the Internet to work even without power, this network switch needs to be “powered”. The ideal solution is an uninterruptible power supply with a battery.
Important: the provider doesn’t always do this on its own initiative and with its own funds. Often, residents of a building or a block of flats contact the company with such a request and install uninterruptible power supply equipment at their own expense. - ADSL-technology. Some companies, such as “Ukrtelecom,” have an old ADSL technology that allows you to use communication and the Internet through an analog telephone line. It works through a copper cable to which landline phones are connected. However, ADSL technology, like a telephone line, will only work if the ATS (automatic telephone station) is powered/independent.
You have checked and found out that your operator has provided for network stability in the event of a power outage? That’s great. But now you need to adapt the equipment in your apartment. Because Wi-Fi will only be available if you have a backup power supply for your home router via a power bank, uninterruptible power supply, or other devices. Otherwise, the Internet will only work on one device, to which you have directly connected the fiber optic cable.
How to power your router so it works without electricity
To power your router, first look at the back of your router or network adapter to see what voltage it needs. Most commonly, it’s 9 or 12 volts (less commonly, 5 volts).
Next, you need:
- A power bank. Read on the device whether it is enough to power your router. The power is indicated by the Watts or letter W.
- A USB 5B/DC 9B or USB 5B/DC 12B converter cable. It converts the voltage at the output of your power bank to the voltage required by your router or network adapter. So which cable to buy – 9 or 12 volts – also depends on the voltage your router or network adapter consumes. There are also cables with a switch between 9 and 12 volts. Most routers have the same DC socket – 5.5 millimeters. However, before you buy a cable, pay attention to what kind of connector your device has.
If you have two devices, you need two cables and two power banks, or two cables and one power bank with two USB slots.
A more expensive but more reliable option is an uninterruptible power supply (UPS). Prices start at around UAH 1,600. This device acts as a voltage stabilizer during power fluctuations, and in the event of an outage, it switches connected devices to battery power. Once the electricity supply is restored, the UPS automatically returns to mains power while simultaneously recharging the battery.
Method 2. Satellite Internet: Starlink or similar companies
This is an almost 100% guarantee of Internet access. But there are also disadvantages: high cost and often low speed. You can order equipment on the official Starlink website. Delivery directly to Ukraine takes longer, but the subscription fee for Ukrainians is currently discounted at $75 instead of $110. Equipment – a terminal and a router – costs $600. Delivery costs $50.
There is a way to order equipment to another country, for example, to neighboring Poland, and then send it to Ukraine. It may be faster. However, you will then pay a monthly subscription fee at the rates for Poland – without a discount.
For satellite Internet to work, you also need uninterrupted power supply for the equipment. And besides that, the right conditions: a wide view of the sky without trees and tall buildings. The best place is the roof of a building or an open balcony on the high floors of an apartment building.
Apart from Starlink, there are other providers that provide satellite Internet, such as the Ukrainian DataGroup and the Dutch Inmarsat.
The instructions were developed together with the State Service for Special Communications and Data Protection of Ukraine
Offline messengers: when there is no internet or mobile connection
When mobile communication is unavailable due to network damage or prolonged power outages, we recommend using national roaming. This service is provided by all Ukrainian operators. How to connect — read here.
Emergency services when there is no internet
Internet access is not required to call emergency services. However, during outages the network may be overloaded, so it is worth preparing in advance.
Save key numbers and backups
- Write down on paper and in your phone’s notes: 101, 102, 103, 112.
- Add hotline numbers for your city or region if available.
Turn on national roaming if your operator disappears
The Ministry of Digital Transformation explains: national roaming allows a subscriber of one operator to temporarily connect to another operator’s network if their own network is unavailable. It is free and activates within seconds.
How to connect to national roaming
Turn off “Automatic network selection”
Android
Settings → Mobile network (or Connections) → Operator (or Network selection) → turn off Automatic network selection.
iPhone (iOS)
Settings → Cellular → Network selection → turn off Automatic.
Manually select an available network of another operator
After turning off auto-selection, your phone will display a list of available networks. Choose any available one (for example, Vodafone / UA-KYIVSTAR / lifecell).
If registration fails on the first attempt, try again or choose another network from the list.
If you need mobile internet, turn on “data roaming”
(This is required specifically for internet access; calls/SMS may work without it.)
Android
Settings → Mobile network (or Connections) → Data roaming → Turn on.
iPhone (iOS)
Settings → Cellular → Cellular Data Options → Data Roaming → Turn on.
Check the connection
– Make a short call.
– Or send an SMS / message in a messenger.
Return to automatic network selection when your operator’s network is available again.
If calls do not go through, try sending an SMS to 112
When the network is overloaded or unstable, voice calls may fail. In such situations, a simple tactic helps: send a short SMS to 112 with the most important information.
How to write an SMS to maximize the chance of delivery:
- One message, minimum characters.
- Structure: who you are — where you are — what happened — what is needed — whether there is a risk to life.
Example:
“Maria. Kyiv, [street name]. Suspected carbon monoxide poisoning, 1 person unconscious. Need 103. Entrance from the yard, code [code].”
Additionally
- If your operator is unavailable, switch to national roaming (see above).
- If possible, send the same message to two contacts (a relative or neighbor) so someone can relay the call.
If both internet and mobile networks are unavailable, offline messengers may help you stay in touch with relatives or neighbors.
According to the Center for National Resistance, these apps may carry certain risks for residents of temporarily occupied territories. Having such a messenger on your phone may raise additional questions from occupying forces and put you at risk.
In wartime conditions, offline messengers can serve as a supplementary means of communication during active hostilities or street actions.
The key feature of offline messengers is that they operate via Bluetooth, Wi-Fi, and networks of smartphones with the same app installed. The range of these messengers is approximately 100 meters.
Please note that these apps are not yet widely used in Ukraine, so government authorities have not issued official assessments of their safety and do not guarantee confidentiality.
We therefore recommend using offline messengers only in extreme cases, when they are your only means of communication.
If you decide to install an offline messenger, download apps only from official websites or stores — the App Store or Google Play.
What offline messengers exist?
Bridgefy
Availability: free
Where to download? Link for iOS — here, link for Android — here.
How does it work? Via Bluetooth connection and only for communication with users who also have the app installed.
Range: 100 meters around you.
Available modes:
Text messages and image sharing between two people or a group (neighbors, family). The recipient does not have to be in your contacts, but to message them you need to enter their phone number.
Broadcast mode — sending messages to all known and unknown users who have launched the app and are within a radius of up to 100 meters around you (this function is a way to share information during mass events, protests, etc.).
Data security: all messages sent between two users or in a group are protected. To use the app, you do not need to have an account or share your phone number. However, phone number verification may speed up finding the users you need.
Note that the “Broadcast” function does not protect the content of your messages and sends it to everyone who has the Bridgefy app within your available radius (100 m).
Briar
Availability: free, but only for Android
Where to download? Link for Android — here.
How does it work? Via Bluetooth or Wi-Fi connection and only for communication with users who also have the app installed.
Range: about 10 meters around you, however if you are farther away, the app will “store” the message and send it when you are again within range.
Available modes:
1. Text chat with one or several people via Bluetooth (in the app, select a person and press “Connect via Bluetooth”) or via a Wi-Fi hotspot you created.
- Thematic forum (test mode) — synchronized communication with people who have the app installed and whom you invite to join the forum, but only after they accept the invitation.
- Blog: you can create a blog whose posts will be visible to all users you have ever added to your contacts — without internet for those within 10 meters, and for those connected to the network regardless of distance.
Data security: works without phone number verification. It is enough to enter your name (or a chosen login) and set a password. Other users will find you by this login.
How to prevent fires when using alternative sources of light and heat
During planned, emergency, or outage-related disruptions to electricity and heating, Ukrainians use alternative sources of heat and light — generators, gas cylinders, stoves, and so on.
Below are recommendations on how to ensure fire safety when using such devices during blackouts, without risk to health or life.
Basic fire safety rules
- Purchase a fire extinguisher. If you live in an apartment building, fire extinguishers should be available in your entrance — ideally on each floor, or at least on the upper floors of high-rise buildings. You can organize the purchase together with your neighbors.
- Check that emergency exits in your building are not blocked. Insist that the building management company ensures they are unblocked, or organize with neighbors to do it yourselves.
- If possible, install a fire alarm at home. Place it in areas with the highest fire risk (for example, the kitchen). Available options include sensors that react to smoke, flame, or elevated temperature.
- Pay special attention to children — do not allow them to use electrical appliances or open flames. Remind them of fire safety rules. To make learning more engaging, you can use educational materials such as a fire safety booklet designed for school programs.
- If you are at home during a power outage, unplug all electrical appliances. This will help prevent damage from voltage fluctuations, especially for heating equipment and electric stoves.
You can also purchase and install a voltage stabilizer, which helps protect appliances from voltage fluctuations. If the voltage suddenly drops or rises, the relay will cut off the power supply until it stabilizes. Cost — from UAH 700.
Extension cord into extension cord: why it is risky and how to do it properly
Connecting devices in a chain (extension cord into extension cord) is dangerous because people often do not monitor the total load — cables and contacts begin to overheat, increasing the risk of sparks and fire.
The State Emergency Service of Ukraine (SESU) emphasizes:
- do not connect many high-power devices to one socket, especially via extension cords;
- monitor the condition of cables and plugs.
It is also emphasized in generator safety guidance that it is important to use high-quality, undamaged cables and extension cords.
How to make it safer
- Use one high-quality extension cord of the required length rather than two connected in a chain.
- Check the maximum load rating of the extension cord (indicated on the body or packaging) and do not exceed it.
- Do not cover cables with carpets or blankets — this prevents them from cooling properly.
- Do not connect high-power heating devices through an extension cord at full load alongside other devices.
How to safely use gas burners
- Buy only certified burners and cylinders from licensed retailers.
- Always check the integrity of the gas canister. Check for leaks using a soap solution — apply it to potential leak points and look for bubbles.
- Strictly follow the manufacturer’s instructions.
- Use the burner in a well-ventilated area.
- Keep gas cylinders away from direct sunlight and high temperatures.
- Never place a gas burner or portable gas stove on an electric stove or any surface that may heat up.
How to safely use candles
- Keep lit candles at a safe distance from clothing, curtains, books, and other flammable materials. Never leave them unattended.
- Do not place candles within reach of children or pets.
- Do not burn a candle down completely — leave a stub of 2–3 cm, which can then be used to make a long-burning candle (instructions in this section).
- Do not use candles as night lights or while sleeping.
- Do not make improvised lighting or heating devices unless you are certain they are safe. Use candle-based devices only under constant supervision.
How to safely use generators
- Buy only certified generators from licensed retailers.
- Strictly follow the manufacturer’s instructions.
- Use generators and fuel only outdoors, at least 6 meters away from windows and doors. Do not place a generator on a balcony.
- Keep the generator dry and protected from rain or flooding — contact with a wet generator can cause electric shock.
- Allow the generator to cool down before refueling to avoid ignition.
- Carbon monoxide detectors can help detect the gas in time and prevent poisoning.
How to safely use a stove
- Before using a stove, place a metal sheet (50×70 cm) on any combustible floor surface in front of the firebox door.
- Maintain the stove: clean chimneys during the heating season and avoid overheating. Ensure there are no cracks in the stove walls or chimney.
- Do not use flammable liquids to light the stove and do not store them near the firebox.
- Do not leave a lit stove unattended and do not ask children to supervise it.
Why you should not “heat up in a car” in a garage
A running engine in a closed garage is a direct risk of carbon monoxide poisoning, which forms when gasoline engines operate in enclosed spaces without ventilation.
How to make it safer
- Do not leave the engine running in a closed garage for heating purposes.
- If you need to start the car, do so with the garage door open, and only briefly for exiting or maneuvering.
- At the first signs of weakness, headache, or nausea, go outside to fresh air and follow the steps for suspected carbon monoxide poisoning.
How to choose a fire extinguisher
If a fire in the room where you are is still small, it can be extinguished before emergency services arrive using a fire extinguisher.
The type of fire extinguisher required depends on the class of fire. The following fire classes exist:
- Solid combustible materials, such as wood, paper, fabric.
- Liquid and solid substances that melt.
- Gaseous substances.
- Metals and their alloys.
- Fires involving electrical installations up to 1000 V.
- Vegetable and animal oils and fats.
There are four main types of fire extinguisher, each suited to different fire classes:
- Powder — suitable for all classes except Class F.
- Water-foam — used for Class A and Class B fires. Cannot be used on electrical installations.
- Carbon dioxide — suitable for Class B and Class E fires. When using, wear warm gloves as it lowers the temperature to -70°C.
- Water — used for Class A fires. Cannot be used on electrical installations.
Which fire extinguisher to choose for home?
The most practical option for apartments and private houses is a powder fire extinguisher. It covers most fire classes, including electrical installations. However, in enclosed spaces, protect your respiratory system due to the fine particulate composition of the extinguisher.
A carbon dioxide fire extinguisher is also a good option. It effectively extinguishes fires involving household appliances and electrical wiring, and causes minimal damage to belongings and furniture. Its main advantage is rapid flame suppression through intense cooling. However, this type is not effective against smoldering fires — if carpets, furniture, or clothing catch fire and are smoldering, its effect may be insufficient.
How many fire extinguishers should you have at home
At least one fire extinguisher should be in every apartment. If the home is large or has multiple levels, having more than one is advisable so that one is always within quick reach.
How to understand if you need a second fire extinguisher:
- If you have a large apartment/house where you would need to run through several rooms to reach one storage point.
- If you have higher-risk sources: a generator, inverter/batteries, a workshop, a lot of equipment, or an electrical panel located far away.
- If the kitchen is separated in such a way that in case of fire the path to the only extinguisher may become dangerous.
A practical guideline: can you reach a fire extinguisher within 10–20 seconds? Most commonly, one is placed near the exit (corridor) and another near higher-risk areas (kitchen, boiler room, workshop). This is the recommended approach from a household safety perspective.
Shared areas of the building
For residential buildings, mandatory standards for entrances may depend on the type and legal classification of the building. In Ukraine, fire extinguisher provision standards are set by Order of the Ministry of Internal Affairs No. 25 of January 15, 2018. For administrative and public buildings, the standard requires at least two fire extinguishers per floor, regardless of floor area.
Where to place them in the entrance
In shared areas, fire extinguishers should be:
- in a visible location that can be found easily in darkness or smoke;
- accessible along evacuation routes, without obstructing passage (not blocking stairs or corridors);
- clearly labeled, with a brief nearby instruction on how to remove the seal, aim, and operate.
If the building has a generator
When a building uses a generator, fire risk increases due to the combination of fuel, hot surfaces, electricity, and extension cords. Official recommendations advise having a fire extinguisher near the generator as a basic fire preparedness measure. A powder or carbon dioxide extinguisher is the practical choice.
In practice:
- One extinguisher should be positioned so it can be reached without approaching the fire source (near the exit or approach path).
- A second one, if available, should be kept as a reserve, also positioned so that a fire would not block access to it.
Inverters and home batteries (charging stations, battery units in shared areas)
If an inverter or batteries are located in an entrance or technical/storage room, the approach should be as cautious as possible:
- A fire extinguisher should be in an accessible location (not next to the fire source, but along a safe approach path).
- Clear instructions for residents: who to call, how to quickly disconnect power (if possible and safe), and which areas to avoid.
Minimum standard for homeowners associations
To ensure fire extinguishers function as a genuine safety tool rather than a formality, it is recommended to establish:
- Signs and stickers marked “Fire extinguisher” with a layout showing their locations;
- Inspection logs (recording who checked, when, the condition of the seal, pressure indicator reading, and service due date);
- An agreed storage location and access arrangement (if kept in a cabinet);
- Maintenance arrangements (service contacts, responsible person, budget).
Where and how to store a fire extinguisher
A fire extinguisher must be easily accessible and must not obstruct evacuation. It should not be stored deep inside a cabinet or on a balcony under boxes — in a stressful situation, you may not find or reach it in time. It should also be protected from conditions that may affect its performance: direct sunlight, heat sources, mechanical impact, and aggressive environments.
There is also a temperature consideration: if the extinguisher is stored in a cold space, ensure it is rated for such temperatures. If it is not designed for conditions below +5°C, it should be moved to a heated space during cold periods.
Portable extinguishers may be mounted on brackets or stands at a convenient height (mounting height up to 1.5 m to the lower edge is recommended).
Inspection and recharging
Fire extinguishers require two key actions: regular inspection and maintenance/recharging.
- Regular inspection
Visual inspection should be carried out at least once a month. Check that the extinguisher is in place, the body is undamaged, there is no corrosion, the seal is intact, the pressure indicator is normal (if present), and the markings are legible. - Recharging and maintenance
There is no universal service interval, as it depends on the type of extinguisher and the manufacturer’s guidelines. The basic principle: maintenance is required if the extinguisher has been used, shows signs of malfunction, or has reached its service due date.
Do not attempt to disassemble or recharge extinguishers yourself — this must be done by certified service providers. After servicing, a label should be placed on the device and the work documented.
If an extinguisher is temporarily taken out of service, it must be replaced with a backup in the meantime.
Rules for the operation of and standard requirements for fire extinguishers (Order of the Ministry of Internal Affairs No. 25 dated January 15, 2018): https://zakon.rada.gov.ua/laws/show/z0225-18
Even if a fire extinguisher is nearby, it is easy to become confused in a stressful situation. It is therefore worth reviewing the instructions for your specific type in advance and watching a short video on how to use it. Two to three minutes spent now is far better than losing valuable seconds during a fire.
This material was developed in cooperation with the Main Directorate of the State Emergency Service of Ukraine in Kyiv.
How to safely store fuel for cars and generators at home
Choose the right container for fuel.
To store gasoline in the cold season, you need polymer (plastic) canisters that meet the following standards:
- the container should hold its shape well and not deform when pressed;
- have the appropriate marking (“PETROL” or “GASOLINE” written on it). It’s best when the abbreviation HDPE is in the labeling – high-density polyethylene that doesn’t accumulate a static charge.
Both polymer and metal canisters are suitable for storing gasoline in the warm season.
Both types of canisters are suitable for storing diesel both in warm and cold seasons.
⚠️ IMPORTANT: it is officially forbidden in Ukraine to fill fuel in glass canisters or containers made of food-grade plastic.
Pay attention to the expiration date of stocks.
Gasoline:
- Factory gasoline (ethanol content – up to 5%) – up to one year.
- Gasoline from a mini-refinery isn’t suitable for long-term storage, but in case of extreme need (for example, a blackout) store it no longer than one month
- Gasoline with a high ethanol content (over 30%) isn’t suitable for long-term storage.
Diesel:
Depending on the season, summer or frost-resistant (winter) diesel is sold. It’s important to remember this not only for proper storage, but also for use so as not to damage the engine. It’s easier to store diesel than gasoline, but you must observe the temperature conditions specified in the documentation at the gas station. Summer fuel, even in mild frost, can become jelly-like or have sediment. Most likely, such fuel will become unusable.
Frost-resistant diesel can be used in the warm season, but it’s spent much faster.
Don’t store fuel in direct sunlight. Ideal conditions are at a temperature of 15-20 degrees in a dark place.
Don’t experiment with diesel dilution methods (for example, to increase frost resistance). Adding kerosene is too dangerous, the positive effect of this manipulation is doubtful. Adding antifreeze at temperatures of -20 degrees and below is possible only in a space with a positive temperature, only in a canister – not in a tank, and immediately before you plan to use it. But the positive effect of this manipulation is also doubtful.
Never use expired fuel to refuel a car or generator. Such gasoline darkens or turns brown instead of pale yellow. This can cause engine damage. Expired fuel must be handed over to a hazardous waste disposal center or used for technical purposes.
The instructions were developed according to the recommendations of the fuel market expert Artem Kuyun
How to receive a compensation for the purchase of a generator in a high-rise building
Residents of apartment buildings in some cities of Ukraine can return part of the money for the purchased generator. Money for compensation is allocated from local budgets. Currently, residents of Kyiv, Lviv and Poltava can do this. Amounts depend on budget possibilities. We explain what is required to receive compensation.
Kyiv
Compensation, which is up to 75% of the cost of the generator can be counted on:
- association of co-owners of multi-apartment buildings (ACMA)
- Housing and construction offices (HCO)
- Managers of apartment buildings
Compensation is possible for generators with a capacity of 5 kW or more for buildings equipped with individual heating points, water pumps or elevators, and for 2 kW for buildings without elevators and ITP (individual heating point).
To receive money, you need to contact the district state administration with an application for compensation (a sample application is here) and a package of documents, which should include:
-
a certified copy of an extract from the Unified State Register of Legal entities, Individual Entrepreneurs and Public Organizations;
-
a copy of the protocol of the meeting of the co-owners of the apartment building on the election of the manager of the building (in the absence of ACMA or HCO);
-
a certified copy of the invoice for the purchase of independent sources of electrical energy.
The term of compensation in case of a positive response from the district state administration is 2 months. The application can be rejected only in case of improper preparation of documents.
Lviv
Residents of multi-apartment buildings (from 3 floors) can receive 50% of the price of the purchased generator, but not more than 30 thousand hryvnias. Compensation was provided for generators with a nominal capacity of 3 kW or more.
In order to become a participant in the program, residents must first pay for the purchase of an electric generator through the bank together with the balance keeper of the building (ACMA, managing company, housing services provider, HCO).
In order to receive money, you need to submit the following package of documents for consideration by the commission through the administrative services center or the electronic application service:
-
an application for partial compensation of the cost of purchasing an electric generator;
-
copies of payment documents (original documents that confirm the fact of receiving the electric generator and making payment for provided goods);
-
copies of documents indicating the technical characteristics and serial number of the electric generator (or other factory marking);
-
a copy of the extract from the Unified State Register of Legal Entities and Individual Entrepreneurs of the house;
-
a document confirming the legal entity’s authority to manage common property (a copy of the contract or an extract from the protocol).
The commission has 10 days to consider the application and make a decision on it.
Poltava
Compensation in the amount of 50% of the generator, but not more than 80 thousand hryvnias, can count on:
- association of co-owners of multi-apartment buildings (ACMA)
- Housing and construction offices (HCO)
- Managers of apartment buildings
Compensation is possible for generators with a capacity of at least 2 kW, and in the presence of an elevator, heating point or water pump – from 5kW.
To receive money, you must provide the city council with:
-
application for compensation (sample application here)
-
copies of payment documents and documents specifying the technical characteristics of electric generators
-
a copy of an extract from the Unified State Register of Legal Entities, Individual Entrepreneurs and Public Organizations
-
a document confirming the authority of a legal entity to manage joint property (a copy of the contract or an extract from the protocol)
How to withdraw money from a card during a blackout?
When preparing for blackouts, you should take care not only of charging stations, flashlights and power banks, but also of your finances. During blackouts, some bank branches, terminals, and ATMs may not work. Therefore, you should have cash in advance and know where and how to withdraw it during blackouts.
What to do for payment autonomy?
- Open accounts in different banks. Having accounts in different banks increases your self-sufficiency if one of them has technical problems.
- Order several payment cards. Keeping money on different payment cards ensures good readiness in the event of a payment service failure. These can be different types of payment cards (debit or credit card) issued by different bank cards.
- Keep cash on hand. You will need it if the electronic payment system is unavailable. Or in case ATMs and terminals will not work due to a blackout. You need to determine the amount of cash individually, taking into account your needs and expenses. The cash reserve should be calculated for approximately 7 to 14 days. You should keep cash in different denominations.
Where to withdraw cash from the card during a blackout?
There are several ways to withdraw cash during a blackout:
- at the cash desk of a bank branch;
- at ATMs or terminals of the bank’s regular branches, which are powered by alternative energy sources;
- using the “Cash at the Checkout” service when paying for goods in stores.
Banks operating during the blackout
The Ukrainian banking system has already adapted to blackouts, so almost all branches have been connected to the Power Banking system.
Power Banking is a united network of Ukrainian bank branches that operate and provide the necessary services to customers even during blackouts. The Power Banking network already includes more than 2,390 branches equipped with alternative energy sources and backup communication channels. In addition, when there are power outages and mobile communication failures, banking applications offer the possibility of a customer’s digital signature. The customer doesn’t need to receive an SMS confirmation to withdraw funds.
Currently, 14 Ukrainian banks are part of Power Banking: Privatbank, Oschadbank, Ukreximbank, Raiffeisen Bank, Ukrgasbank, Sens Bank, PUMB, Ukrsibbank, OTP Bank, Universal Bank, Pivdennyi, Kredobank, Tascombank, and A-Bank.
The map of the bank’s branches is updated regularly. You can find a list of branches operating without electricity here.
Banks also inform about their branches operating during blackouts on their websites, social media and online support.
At Power Banking outlets, you can withdraw cash from an ATM or cash desk, transfer funds through a terminal, exchange currency and consult with financial managers.
However, it should be taken into account that even within the Power Banking network, cash withdrawal limits apply. On average, the amount is UAH 10-20 thousand per day, although there are exceptions. For example, in Oschadbank, you can withdraw up to UAH 50 thousand per day.
Do ATMs work without electricity?
You can withdraw cash during a power outage at bank branches connected to generators.
In the event of an absolute blackout and, accordingly, a complete lack of network coverage, you should prepare in advance. The easiest way is to save the information from the NBU or your bank on your phone: for example, take a screenshot or download the page in full.
It is worth noting that the network of ATMs operating without power is changing. Only ATMs in duty branches can guarantee uninterrupted operation, while the rest depend on the availability of power, network and cash inside.
ATM switched off during a transaction: what to do?
During a power outage, the screen of an ATM or terminal may switch off at any time, even during the transaction itself. You may not receive the funds you planned to withdraw, may not receive your bank card back, or may not be able to send money to the recipient, even though you have already deposited a certain amount into the terminal.
The situation is unpleasant, but there is no need to panic. Customers could have faced similar problems even before the war, so banks have long had a solution.
The algorithm is simple: go to a branch of your bank that is open and write a statement that the ATM failed to issue money/card. You may also contact the bank’s hotline if there is a signal. The number is always available directly on ATMs and terminals. The operator will issue a request for a refund.
As for the refund period, according to the NBU’s instructions, it is up to 45 days. However, this is the maximum period that you should not focus on. You can get your money back in just a few hours or days.
By the way, you can report problems with an ATM immediately, the next day or even a week later. There is no time limit, but it is in your interest to do so as soon as possible and forget about the financial trouble.
Bank hotline numbers:
- PrivatBank – 3700
- Oschadbank – 0800 210 800
- Monobank – 0800 205 205
- Ukreximbank – 0800 50 44 50
- Ukrgasbank – 358 or 0800 309 000
- Raiffeisen Bank – 0 44 490 89 95
- Sens Bank (Alfa-Bank) – 0800 50 20 50
- Ukrsibbank – 729 or 0800 505 800
- PUMB – 050 290 7 290 or 093 290 7 290
- OTP Bank – 044 490 05 0
- Crédit Agricole – 0800 30 5555
- Tascombank – 0800 503 580 or 044 393 25 90
- Kredobank – 0800 500 850 or 032 240 06 00
- Ukrsotsbank – 0800 300 090
- Pivdenny – 0800 307 030
How to withdraw money at the checkout of a store or pharmacy?
You can withdraw cash from your bank card at the cash desks of supermarkets, pharmacies and petrol stations where the “Cash at the checkout” service is available. It is important to note that money can only be withdrawn when paying for the purchase with the card. The maximum and minimum amount is determined by each institution independently. In most of them, you can withdraw no more than UAH 6000 at a time.
Each bank sets the fee for withdrawing money independently. For example, Monobank’s commission for personal money is 0.9%, for credit money – 4% of the withdrawal amount. PrivatBank’s commission for a payment card is 0%, for Universalna – 1% for personal funds, 4% for credit funds.
In order to withdraw funds, you must:
- choose a product and go to the cash desk with it (to withdraw cash, you must buy something, even for 1 hryvnia);
- inform the cashier of your intention to withdraw cash and specify the amount of withdrawal;
- pay with a Mastercard or Visa card;
- receive cash from the cashier.
The list of shops, pharmacies and petrol stations where you can withdraw money from your card at the checkout
Supermarkets: Silpo, Fora, Fozzy, Novus, ATB, Auchan, Varus, Spar, Megamarket, Roshen, Sviy Market, Torba, Lotok, THRASH!, Tochka, SIM23, Nash Krai, Delvi, WineTime, Spirit&Food, Posad.
Pharmacies: ANC, Apteka 911, Bila Romashka, Blagodiya, Kopiika, Vitamin, Podorozhnyk, Med-Service, Salve, Shara, Pharmacy of the Good Day, Pharmacy of Wholesale Prices, 1 Social Pharmacy.
PETROL STATIONS: OKKO, WOG, Ukrnafta, Avias, BRSM-Nafta, SOCAR, AMIC.
Other shops: KOLO, Epicentr, PROSTOR, Foxtrot, Dnipro-M, Shik i Blisk, Kopiyochka, Territory of Your Equipment, MasterZoo.
What products to stock up on
Take care of nutritious foods with a long shelf life. If necessary, you can take them with you to the shelter. It’s desirable that these products don’t require a lot of water for cooking.
- freeze-dried products (cereals, soups, noodles)
- canned meat, fish, vegetables
- bread and cookies
- nuts
- chocolate
- dried fruits
Also, think about what foods you and your family consume. Make a three-day supply for home.
Even if there is no electricity, keep food in the refrigerator: it’ll keep cold for several hours after a power outage. Try to open the door as seldom as possible. Eat perishable foods first.
If the temperature outside is low, food can be kept outside.
How not to come across spoiled products in stores during power outages
In conditions of rolling and emergency power outages or possible blackouts, the risk of purchasing spoiled products that were stored in improper conditions – without observing the set cooling temperature – increased.
-
If power outages in your area are scheduled, when choosing a store, we advise you to check the address of the store in the schedule of power outages on the supplier’s website. For example, for Kyiv – on the Yasno website. The best option is a store whose building is located on the same line with a critical infrastructure object, where shutdowns either don’t occur, or they occur less often than on other lines. In such cases, there is less risk of encountering products whose storage conditions have been violated due to the shutdown of refrigerators and freezers.
-
If there are no stores nearby where the lights are not turned off, find one where the owners have installed a generator.
-
First of all, buy those food products that have been produced recently and have been kept in stores as little as possible.
-
Try to buy food products in establishments with a higher turnover (larger number of customers) and, accordingly, more frequent delivery schedules from manufacturers of perishable food.
-
Pay attention to the load of refrigerators with food products. Overloaded refrigerating equipment, where there is no air circulation, isn’t able to maintain the temperature for a long time after the power is cut.
-
Avoid purchasing products from the list of those that deteriorate first in the absence of electricity.
-
Always pay attention to the packaging date, the expiration date and the storage conditions (compare whether what is recommended on the label matches the conditions in which these products are stored in the shop)
-
Avoid “half price” products whose expiration date is coming to an end. In modern realities, the risk that the product has already spoiled is higher.
Which products spoil first and what are the alternatives
- Chilled meat. If you doubt its quality, give preference to frozen meat. However, provided that it hasn’t had time to thaw and has no signs of spoilage.
- Ready food. It’s undesirable to store it without a refrigerator for more than 2 hours.
- Boiled sausage products (sausages, wieners, boiled sausage). As an alternative, choose smoked sausage or dry-cured, vacuum-packed.
- Weight sour milk cheese. Give preference to cheese in vacuum packaging.
- “Milk products”. Instead of bottled milk with a short shelf life, choose milk in “tetra packs”, which can be stored without refrigeration.
- Fish and fish products.
- Confectionery (cupcakes, cakes, mousses). Instead, choose candies, bars, cookies, which don’t require special storage conditions.
How to understand that the product has begun to spoil
Fish
Fresh fish have dense and elastic scales, fins are moist and soft, gills are pink or bright red, without mucus, and eyes are transparent and bulging. The meat of fresh fish is elastic, moist, juicy and has a healthy shine. To check, press on it with a finger: if the meat doesn’t return to its former shape for a long time, the fish is spoiled.
One of the signs that the fish has begun to spoil is the smell of ammonia.
Meat
Fresh chicken always has a homogeneous color: pale or light pink. There should be no extraneous odors from the product. The skin in poultry can be exclusively white or yellow. If the chicken is sticky, smells bad (chemicals or has a sour smell), is too pale or spots appear on it, it has started to spoil.
Fresh beef is of a red or dark red shade, with veins and with a neutral smell. When pressed, the surface of the meat will quickly return to its previous shape. Grayness, yellowing and spots are signs that the beef is spoiling.
Fresh pork is pale pink in color. Darkening at the edges of a piece of meat or a non-homogenous color may indicate that the meat is weathered.
How to save food at home during a power outage
Monitor the temperature in the refrigerator and freezer. The temperature in the refrigerator should be 4°С or lower. In the freezer – 0°С or below. However, even in the absence of electricity, the fridge will keep cold for several hours after the shutdown. Try to open the door as seldom as possible. Eat perishable foods first.
If the temperature outside is low, food can be kept outside.
Never taste food to check its safety.
Buy perishable food in small portions.
If you have a piece of meat or fish left in your stash, it’s best to cook it (provided you have a gas stove or have alternative cooking methods, such as a backyard grill). And if you’re worried that you won’t have time to eat, share the dish with someone, for example, with your neighbors.
You can safely refreeze or cook frozen foods that still contain ice crystals or are at 4°С or below.
What to cook when there is no electricity
Some grains do not need to be cooked — it is enough to pour water over them and leave them to soak. We therefore recommend keeping them in stock for blackouts and other emergencies.
Porridges that require boiling water
- Barley porridge
Pour boiling water over it and leave for 2–3 hours. - Millet porridge
Pour boiling water over it and leave for 1 hour to infuse. - Wheat porridge
Pour boiling water over it and wrap the container in a blanket to retain heat. Leave for 30–50 minutes to infuse. - Bulgur
Medium or fine bulgur does not need to be cooked. Fine bulgur infuses in boiling water in 20 minutes; medium bulgur takes 40 minutes.
Porridges that can be prepared with cold water (kefir or milk)
- Buckwheat porridge
Brown buckwheat sold in stores is already pre-treated (roasted and dried), so if there is no gas or electricity, the grain can be soaked in room-temperature water, milk, or kefir for 5–10 hours. It is best to soak it overnight. - Pearl barley
Can be soaked in either boiling or cold water. In cold water it needs 10–24 hours, so it is best soaked in the evening. - Couscous
In cold water, leave for 20–30 minutes. In hot water, 5–10 minutes is sufficient. - Oatmeal (or oat flakes)
In cold water, leave for 30 minutes to 1 hour. In boiling water, 20 minutes is sufficient. - Semolina porridge
Pour cold water or milk over semolina, cover, and leave to infuse for 15–20 minutes. - Quinoa
Pour cold water over it and leave overnight.
All of the above can also be prepared in a thermos. One hour of cooking on a stove is equivalent to 4–5 hours of infusing in a thermos.
If you have a portable stove at home, you can prepare a filling meal with a minimal set of ingredients. We suggest trying sweet-and-sour chicken and couscous with vegetables — cooking time is up to 30 minutes.
Ingredients for 2 servings:
Chicken fillet — 500 g
Egg — 1
Butter — 30 g
Salt — 1 tbsp
Rice vinegar (can be replaced with regular vinegar) — 1 tbsp
Starch — 1 tbsp
Oil — 250 g
Ketchup — 3 tbsp
Sugar — 1 tbsp
Honey — 1 tsp
Water — 1 L
Couscous — 1 cup
Carrot — 1
Onion — 1
Garlic — 1 clove
Sweet-and-sour chicken recipe
Step 1. Marinate the meat
- Cut 500 g of chicken fillet into pieces
- Add salt (1 tbsp), rice vinegar (1 tbsp), egg (1 pc), and starch (1 tbsp)
- Mix and leave for a few minutes
Step 2. Prepare the sauce
Combine ketchup (3 tbsp), sugar (1 tbsp), honey (1 tsp), add 100 ml of water and mix everything.
Step 3. Fry the meat
Fry the marinated meat in a pan with heated oil (150–200 ml) until golden brown.
Step 4. Finish cooking
Grease the pan with butter (30 g), add the sauce and meat, and fry for about 5 minutes over medium heat.
Couscous with vegetables recipe
- Fry the carrot (1 pc) with the onion (1 pc)
- Add a clove of garlic and a pinch of salt
- Fry the vegetables for 3–5 minutes
- Add 1 cup of water and 0.5 cup of couscous
- Cook everything together for 5 minutes
What candles to buy in case of a blackout
Due to disruptions to electricity supply and the risk of blackouts, Ukrainians are advised to stock up on candles. Here is an overview of the types available and how they differ.
Beeswax candles
The most environmentally friendly option, with no strong smell. Beeswax practically does not burn — it melts — and produces no soot.
Sometimes a small proportion of paraffin is added to avoid disrupting the natural properties of the wax. However, if a beeswax candle has horizontal cracks and crumbles easily, it contains more than 30% paraffin.
Such candles are more expensive than others due to the high cost of raw materials. Prices start from UAH 100 for a set of thin (“church”) candles.
Burning time depends on size, but the smallest ones from stores burn for up to one hour.
Vegetable wax candles (stearin candles)
Stearin is produced from various oils, such as palm oil. Stearin candles are easy to recognize: they are matte, and after burning they form a transparent layer with a pattern resembling snowflakes.
- Palm wax candles
a hard, non-greasy material that burns with almost no smell. However, it is brittle and breaks easily. - Soy wax candles
matte white in color; when heated, the material becomes liquid and transparent, with a mild “milky” scent. - Coconut wax candles
more expensive than palm and soy candles and longer-burning (1 cm burns for up to 5 hours). Rarely found in stores.
These candles have a concentrated aroma and are best suited to large rooms.
Prices for vegetable wax candles start from UAH 100 for a small candle.
Burning time depends on size, but the smallest burn for up to 45 minutes.
Paraffin candles
Paraffin is a petroleum refining product. Without additives and additional purification, it has an unpleasant smell. There are candles made from highly refined paraffin, as well as those with added fragrances.
The more poorly refined the paraffin, the more soot the candle produces, with an uneven flame and black residue during burning.
Avoid burning paraffin candles one after another without breaks — ventilate the room between uses.
Their main advantage is low price. The smallest paraffin candles start from UAH 20.
Burning time depends on size, but the smallest burn out in about 30 minutes.
Gel candles
Made from gel-like mineral oils or synthetic hydrocarbons, these candles are safer than those made from technical paraffin. However, they have one drawback — decorative fillers. When burning, fabric and plastic fillers may emit an unpleasant smell and can easily catch fire, making the fire difficult to control. Choose gel candles with stone or mineral fillers that do not ignite.
Burning time — on average 4 hours (depending on size).
Average price — 250 UAH.
How to make a candle yourself
Long-burning candle
From one 30 cm wax candle, you can make 6 long-burning candles, each of which will burn for 10–12 hours.
What you need:
- a small jar, glass, or thick-walled cup
- a paraffin candle
- a wax candle
- a pinch of salt
- oil (refined, odorless)
- a knife
- matches or a lighter
How to make it:
- Divide the wax candle into sections of approximately 5 cm each.
- Drip a little melted paraffin onto the bottom of the container and, before it hardens, fix a piece of candle in it.
- Pour oil into the container and add a pinch of salt to remove moisture from the oil.
- The long-burning candle is ready.
Potato candle
What you need:
- a small plate (glass or clay)
- a potato
- an improvised wick — a string made of natural fabric, gauze, bandage, or a shoelace
- oil (refined, odorless)
How to make it:
- Pour approximately 100 ml of oil into the plate.
- Cut a slice of potato about 1 cm thick and make a hole in the center for the wick.
- Coat both the potato slice and the wick with oil.
- Thread the wick through the potato so that about half a centimeter remains above the surface.
- Place the potato in the plate with oil and light the wick.
Approximately 100 ml of oil and 3–5 cm of wick will burn for up to 6 hours.
How to dress outdoors during street lighting outages
Due to Russian attacks on energy infrastructure, emergency street lighting outages may occur during a full blackout, or planned outages may be introduced to conserve electricity. As a result, drivers may not always be able to see pedestrians clearly. We therefore recommend paying attention to your choice of clothing in low-light conditions.
- Choose light-colored clothing — this makes you easier to spot on the road. People dressed in dark clothing are almost invisible when there is no street lighting. You do not need to wear all white — at least half of your outfit (a jacket or trousers) should be light-colored.
- Use reflective elements on your clothing. These can include a bracelet, an armband, a strip for your arm or backpack, a sticker, or a vest. A sticker or armband costs around UAH 50, while vests range from UAH 100 to UAH 300. Reflective elements significantly increase your visibility to drivers — according to statistics, they reduce the risk of being hit by a car by up to six times.
Please note that since 2021, clause 4.4 of the Traffic Rules requires pedestrians moving along the roadway or roadside in the dark or in conditions of limited visibility to use reflective elements.
- Take care of yourself, your family and your pets too. Get them a glowing collar or accessories with reflective elements.
How to wear reflective elements
- Place them at the driver’s eye level.
- Elements larger than 15 cm² are most effective.
- The most visible color for reflectors is yellow.
- Attach reflective accessories, patches, or keychains to bags and backpacks on the side facing traffic, or on both sides.
- Pay special attention to children — they should have multiple reflective elements on their clothing, placed at the level of the head, torso, and arms, as children are less visible on the road due to their height.
How to prepare a stock of water and disinfect water for drinking
In case there is no central water supply, always have a stock of drinking and technical water at home. Calculate the supply according to the number of members of your family. One adult needs per day:
-
3 liters of drinking water (including liquid consumed with food)
-
10-12 liters for hygiene and cooking.
Make sure you have a supply of water for you and your family for at least 72 hours. Be sure to mark the containers with tags: “Water disinfected for drinking”, “Water for technical needs”, “Water for household needs”.
If packaged bottled drinking water isn’t available, use drinking water from wells, mine wells, drinking water dispensing points (including mobile ones), if available, and pump stations. Look for their addresses on the website of the local water utility.
If there is no water in the taps for a long time or you didn’t stock it up in advance, here are tips that can help.
Where to get water for drinking
Important: all these methods of water purification don’t give a 100% guarantee that the water will be safe, but it can still save you from dehydration.
Boiling method
For drinking and cooking, boil water from alternative sources: wells, pumping stations, and water dispensing points. This is an effective method of its disinfection. It’s necessary to boil for at least 10 minutes from the moment of boiling. But even when stored in a clean and well-closed container, the shelf life doesn’t exceed one day.
Water filters
Already now, buy several water filters and purify water from wells and pump stations additionally after boiling.
Touristic tablets for water disinfection
You can disinfect water with tablets containing chlorine, iodine, chlorine dioxide or other disinfectants. Such tablets can be purchased in tourist shops and pharmacies. However, strictly follow the instructions for use.
Disinfection with activated carbon
You need 4-5 pills per liter of water. They should be crushed, wrapped in cheesecloth and placed in a container with water for 6-12 hours. Such disinfected water will be usable for no more than three days.
Disinfection with iodine
WARNING! Consult your doctor before using this method! Iodine can be dangerous for pregnant women, people with thyroid problems and those who are allergic to iodine.
3-4 drops of iodine per liter of water. After that, it should be passed through a filter and wait an hour before drinking. However, the smell and taste of iodine will be felt in the water. You can’t drink such water for a long time.
Distillation of water using the sun
Distill water using solar distillation. To do this, stretch a transparent pellicle over a vessel with water and place it so that the sun’s rays shine on it. Under the influence of the sun and temperature differences, water condensate will collect on the pellicle, which will be distilled, that is, purified. Next, it’s necessary to make sure that the drops of clean water flow from the pellicle into a separate clean container – a bottle or a mug. You can use a cut disposable straw or a plate bent lengthwise through which purified water will flow.
Filtration of rainwater and water from open bodies of water (emergency method)
If the situation is critical, it’s possible to boil river or lake water and pass it through a filter, but only if the lake is clean and if the water in the region is not contaminated with radioactive dust. This method can’t be applied to water from reservoirs where the water stagnates or blooms: such water is a breeding ground for insects, bacteria and viruses. Rainwater is also dangerous. But if there are no other sources, then it can also be passed through a filter after boiling. This method can be used only when the situation is critical: there is no chance of finding potable water or water from wells or pumps and disinfecting it, and survival is the priority. In other cases, it’s dangerous to use water from open bodies of water or rainwater. And you can only use it as a technical one.
We don’t recommend using the method of water purification with silver. It’s not effective enough for disinfection, in addition, silver ions can be toxic to the body and cause irreparable damage to health.
Where to get technical water
If the situation in your city isn’t critical, local authorities and utility companies organize the delivery of water to areas where there is no central water supply
Your acquaintances from other areas of the city may have water supply. Contact them or in the chats of other areas of the city with strangers and ask for help with water.
As technical water, use water from open bodies of water, preferably from lakes where it doesn’t stagnate. If there is no spring, a river or lake with clean water is best. If technical water isn’t needed for washing hands, but, for example, for flushing the toilet, water from any body of water is suitable.
For washing hands or other technical needs, you can use water from the toilet tank. One tank holds 6 liters of water on average.
Rainwater. In some houses, a drain is installed through the roof into special barrels or faucets, through which you can collect rainwater flowing from the roof.
In winter, you can melt snow from the street to obtain technical water.
Drain water from the boiler if you have one. To do this, first shut off the cold water supply. Open the safety valve located at the bottom of the boiler. Open the faucet in the “hot water” position and fill the container with water.
If your boiler is installed differently, find instructions on how to drain water from your model.
Water for technical use can be additionally disinfected by the method of infusion. For this, you will need a glass or ceramic container that closes. But by no means aluminum. You can put the water overnight, and in the morning carefully strain it through several layers of gauze, leaving the sediment that formed at the bottom immovable. However, such water will still be unsuitable for consumption.
Important information for the media, bloggers and all citizens who photograph or write about war and the army
What is categorically prohibited to be covered by the mass media during wartime:
- names of bases and subdivisions, as well as their locations
- the number of soldiers in bases and units
- the number of weapons and equipment, their condition and place of storage
- conditional marks of objects
Any information about:
- operations carried out or planned
- system of protection and defense of military units
- available military protection such as: weapons and equipment(except visible or obviously expressed)
- procedure for engaging forces (military) and facilities (weapons)
- intelligence gathering
- movement and deployment of troops (names, numbers, routes)
- military units and their tactics, methods of action
- unique operations and their execution methods
- the effectiveness of the enemy’s electronic warfare
- postponed or canceled operations
- missing or crashed aircraft, ship and search and rescue operations
- plans for the security of our troops (disinformation, camouflage, countermeasures)
- informational and psychological operations carried out or planned
- propaganda or justification of russia’s large-scale armed aggression against Ukraine.
Do not post on social media:
- consequences of hits by enemy’s missiles or projectiles or moments of their flight in the sky. By doing so you will help the enemy to adjust the fire.
- time and place of “hits” (neither in publications nor in comments)
- information about the work of the Ukrainian Air Defense Forces
- a photo showing numbers, special markings and markings on destroyed or downed enemy equipment.
- unverified information about victims or dead.